 Viral Cucumber Salad: Fresh, Healthy, and Bursting with Flavor
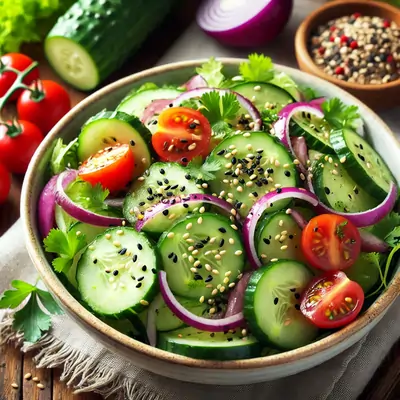
Cucumber salad has become a viral sensation, and it’s not hard to see why. This crisp, refreshing dish is simple to prepare, packed with nutrients, and versatile enough to pair with almost any meal. Whether you’re looking for a light snack, a side dish, or even a healthy meal on its own, cucumber salad is a fantastic choice. Its fresh ingredients and easy-to-make dressing make it a hit with both seasoned cooks and kitchen newbies. 
Here’s everything you need to know about making this viral cucumber salad and why it deserves a spot in your recipe rotation. 
Table of Contents
Why You’ll Love Cucumber Salad
- Refreshing: Perfect for hot days or when you need a light, cooling dish
 .
. - Quick & Easy: Takes only a few minutes to prepare
 .
. - Healthy: Low in calories, packed with vitamins, and hydrating!
- Versatile: Customize it with various ingredients like tomatoes, onions, or herbs
 .
. - Perfect Side Dish: Pairs beautifully with grilled meats, sandwiches, or even a simple pasta dish

 .
.
Cucumber Salad Ingredients
To make this viral cucumber salad, you’ll need just a handful of fresh ingredients, many of which you probably already have at home:
| Ingredient | Quantity |
|---|---|
| Fresh cucumbers | 2-3 large, sliced thin |
| Red onion | 1 small, thinly sliced  |
| Cherry tomatoes | 1 cup, halved |
| Fresh herbs (cilantro/parsley) | 1/4 cup, chopped |
| Olive oil | 2 tbsp  |
| Vinegar (apple cider/white) | 1 tbsp  |
| Sesame seeds | 1 tsp  |
| Salt and pepper | To taste  |
 , feta cheese, or different spices!
ADVERTISEMENT

 How to Make This Cucumber Salad
Now let’s dive into the process! This cucumber salad is quick to prepare, and you don’t need any special equipment—just a knife, a cutting board, and a bowl.
Step-by-Step Instructions
Let the salad sit for about 10 minutes before serving, allowing the flavors to meld together.
Prep Your Cucumbers:
- First, wash your cucumbers thoroughly. If you’re using English cucumbers, you can leave the skin on for added crunch, but if you’re using standard cucumbers, you might want to peel them to avoid bitterness.
- Using a sharp knife or mandoline slicer, thinly slice the cucumbers. The thinner the slices, the better they’ll absorb the dressing, giving you a flavorful bite.
Slice the Onions and Tomatoes:
- Thinly slice your red onion. Red onions are perfect for this dish because they add a pop of color and a slightly sweet flavor.
- Slice the cherry tomatoes in half. This step adds both a juicy element and a burst of color to the salad.
Prepare the Dressing:
- In a small bowl, whisk together olive oil and vinegar. You can use apple cider vinegar for a more mellow taste or white vinegar for a sharper bite. If you like a tangy flavor, feel free to add a bit more vinegar.
- Add salt and pepper to taste, and if you like a little heat, sprinkle in some red pepper flakes.
Toss the Salad:
- In a large mixing bowl, combine the sliced cucumbers, red onion, and cherry tomatoes.

- Pour the dressing over the vegetables and toss gently until everything is evenly coated.
Add the Final Touches:
- Garnish your salad with sesame seeds for a nutty flavor and a bit of crunch. Freshly chopped cilantro or parsley also adds a fresh, herbal note that pairs perfectly with the other ingredients.
ADVERTISEMENT

Pro Tips for Making the Best Cucumber Salad
- Use a Mandoline Slicer: This tool ensures thin, even slices of cucumber that soak up the dressing beautifully.

- Chill Before Serving: Pop the salad in the fridge for 10-15 minutes to make it extra refreshing, especially on hot days.

- Add Crunch: For a crunchy twist, throw in some chopped nuts like almonds or sunflower seeds.

- Go Dairy-Free or Vegan: The base recipe is naturally dairy-free and vegan, but you can add or omit ingredients based on your preferences. For example, add some crumbled feta cheese for a Mediterranean vibe.

Customize Your Cucumber Salad
One of the best things about this cucumber salad is its versatility. You can easily adapt it to suit your tastes or what you have on hand. Here are some popular variations:
- Add Avocado: For extra creaminess and healthy fats.
- Throw in Feta: Adds a salty, tangy flavor.
- Incorporate Peppers: Add some diced bell peppers or jalape?os for a crunch or spicy kick.
- Sweeten with Fruit: Try adding a few slices of watermelon
 or berries for a sweet contrast.
Nutritional Benefits of Cucumber Salad
Aside from being incredibly tasty, cucumber salad is loaded with nutrients:
- Hydration: Cucumbers are about 95% water, making this salad great for hydration.

- Low in Calories: This salad is a perfect option if you’re watching your calorie intake—it’s light and satisfying.

- Rich in Antioxidants: Tomatoes and herbs like cilantro are rich in antioxidants, helping fight off free radicals.

- Vitamin Boost: You’ll get a healthy dose of vitamins like vitamin K (in cucumbers) and vitamin C (in tomatoes).
 Nutritional Info (Per Serving)
| Nutrient | Amount |
|---|---|
| Calories | 75 kcal |
| Protein | 2 g |
| Fat | 5 g |
| Carbohydrates | 6 g |
| Fiber | 2 g |
| Vitamin K | 30% of the RDA |
| Vitamin C | 15% of the RDA |
Final Thoughts: Why Cucumber Salad Should Be Your Go-To Dish
The viral cucumber salad is more than just a trend—it’s a refreshing, healthy, and incredibly versatile dish that fits into any meal plan. Whether you’re preparing it for a quick snack, a side dish, or a light lunch, this salad is sure to become a staple in your kitchen.
Try it out today and see why everyone is raving about it!
 5 Frequently Asked Questions (FAQs) About Cucumber Salad
Can I make cucumber salad in advance?
Yes! You can make cucumber salad a few hours ahead. It actually tastes better after sitting for a while because the flavors have more time to meld. However, cucumbers release water, so it’s best to enjoy it within 2-3 days if stored in the fridge. 
What’s the best way to keep the salad crunchy?
To keep your salad crunchy, serve it immediately after making or chill it in the fridge for 10-15 minutes. Using English cucumbers can also help since they have fewer seeds and stay crunchier. 
Can I use different types of vinegar for the dressing?
Absolutely! Apple cider vinegar adds a mellow, fruity flavor, while white vinegar has a sharper taste. You can also try balsamic vinegar for a richer, sweeter touch.
Is cucumber salad good for weight loss?
Yes! This salad is low in calories and high in water content, making it a great option for those looking to stay hydrated and manage their weight.
What other ingredients can I add to cucumber salad?
You can customize your salad with various ingredients. Popular additions include feta cheese , avocado , bell peppers , or even fruit like watermelon for a sweet twist.
ADVERTISEMENT

We Also Recommend:
- JILIVIP App
- JILIVIP Bonus
- JILIVIP Login
- GXGWin Casino
- GXGWin Bonus
- GXGWin Register
- PHWin Login
- PHWin Bonus
- PHGinto
- JK4 Casino Online
- GXGWin App
- 9KSLOT Casino
- WinPH Casino
- 88Casino Royale
- PHGinto Login
- GXGWin Login
- 9KSLOT Login
- PHRoyal777 Casino
- YAMAN777 Gaming Casino
- GXGWin Register
KEYWORDS: Cucumber Salad

Ghen is an accomplished SEO specialist renowned for her expertise in the online gaming industry. With over a years of experience, she has significantly boosted the online presence of numerous gaming platforms. Her innovative strategies in keyword research, content optimization, and link building have consistently driven substantial increases in organic traffic and user engagement. Ghen’s deep understanding of search engine algorithms and her ability to adapt to the ever-evolving digital landscape have made her a pivotal figure in the industry, helping gaming companies achieve and sustain top rankings in search results.

 10 Simple Steps to Perfectly Bake Cookies Every Time!
Baking cookies is a fun and rewarding activity that brings joy to both beginners and seasoned bakers alike. The simple pleasure of mixing ingredients, smelling the sweet aroma filling the kitchen, and finally enjoying warm, freshly baked cookies is unmatched. Whether you’re making classic chocolate chip, oatmeal, or a more creative flavor, the process offers endless possibilities to customize and create the perfect treat.
For beginners, it might seem challenging, but with a few basic steps, you can achieve delicious results every time. By following these 10 simple steps, you’ll learn how to mix, bake, and create cookies that are golden, chewy, and packed with flavor—perfect for sharing with loved ones or enjoying all by yourself! 
Table of Contents
1. Gather Your Ingredients to Bake Cookies 
Before you start, make sure you have all your ingredients measured and ready. Here’s a basic cookie recipe ingredient list to get you started:
| Ingredient | Amount |
|---|---|
| All-purpose flour | 2 ? cups |
| Baking soda | 1 teaspoon |
| Salt | ? teaspoon |
| Unsalted butter (softened) | 1 cup |
| Granulated sugar | ? cup |
| Brown sugar (packed) | ? cup |
| Eggs | 2 large |
| Vanilla extract | 2 teaspoons |
| Chocolate chips | 2 cups |

2. Preheat the Oven 
Preheat your oven to 350°F (175°C). This allows your cookies to bake evenly and ensures that they rise and spread correctly. If your oven isn’t hot enough when you start baking, the cookies may turn out flat and undercooked. 
3. Mix Dry Ingredients 
In a medium bowl, whisk together your flour, baking soda, and salt. This step is essential to make sure all the dry ingredients are evenly distributed. Set this bowl aside for later.
ADVERTISEMENT
4. Cream Butter and Sugar Together 
In a large mixing bowl, beat the softened butter, granulated sugar, and brown sugar until smooth and creamy. This should take about 2-3 minutes with a hand or stand mixer. Properly creaming the butter and sugar helps create light, fluffy cookies. 
Tips for Success:
- Make sure your butter is at room temperature, so it blends easily.
- Avoid over-mixing as it can result in dense cookies.
5. Add Eggs and Vanilla 
Next, add the eggs one at a time, mixing well after each addition. Then, pour in the vanilla extract and continue mixing until everything is well combined. Your dough will be smooth and rich at this stage, setting the foundation for flavorful cookies.
ADVERTISEMENT
6. Combine Wet and Dry Ingredients 
Gradually add your dry ingredients to the butter and sugar mixture. Mix on a low setting to avoid overworking the dough. Over-mixing at this stage can make your cookies tough, so stop mixing as soon as the flour is fully incorporated.
7. Fold in Chocolate Chips
Gently fold in the chocolate chips (or any other mix-ins like nuts, dried fruits, or white chocolate chunks) with a spatula. Make sure they’re evenly distributed throughout the dough so every bite is filled with deliciousness!
8. Scoop the Dough
Use a spoon or cookie scoop to portion out your cookie dough onto a parchment-lined baking sheet. Make sure the scoops are evenly sized for even baking. Place them about 2 inches apart to give them room to spread as they bake. 
Pro Tip:
For a bakery-style cookie, roll your dough into balls and chill them in the fridge for 30 minutes before baking. This step results in thicker, chewier cookies.
9. Bake the Cookies 
Place the baking sheet in the preheated oven and bake for 10-12 minutes or until the edges are golden brown, and the centers look set but slightly soft. Every oven is different, so start checking your cookies around the 9-minute mark.
Baking Time Chart:
| Cookie Type | Baking Time |
|---|---|
| Thin and crispy | 8-10 minutes |
| Soft and chewy | 10-12 minutes |
| Thick and gooey | 12-14 minutes |
10. Cool and Enjoy! 
Once your cookies are done baking, remove them from the oven and allow them to cool on the baking sheet for about 5 minutes. Then, transfer them to a wire rack to cool completely. This step helps them firm up and become the perfect texture.
Now, it’s time to enjoy your homemade cookies! Whether you dip them in milk or enjoy them on their own, you’ll have a batch of perfectly baked cookies to share with friends and family.
Additional Tips & Tricks 
Customize Your Cookies: Swap out chocolate chips for your favorite candy or add in a pinch of cinnamon for a warm twist.
Cookie Dough Storage: You can freeze cookie dough balls for up to 3 months. Just thaw and bake whenever you’re craving freshly baked cookies!
Don’t Over-Bake: Even if your cookies look slightly undercooked in the center, remove them from the oven. They will continue to cook while cooling on the baking sheet.
How do I make cookies chewy instead of crispy?
To make cookies chewy, use more brown sugar than white sugar and slightly under-bake them. You can also add an extra egg yolk for added moisture.
Why do my cookies spread too much?
Cookies spread too much when the dough is too warm. Chilling the dough before baking can help maintain their shape. Also, ensure you’re using the right amount of flour.
Can I substitute butter with oil when baking cookies?
Yes, but it will affect the texture. Butter provides structure and flavor, while oil tends to make cookies denser and more moist.
How can I prevent my cookies from burning on the bottom?
Use parchment paper or silicone baking mats to prevent burning. Also, make sure your oven rack is placed in the middle of the oven.
What can I do if my cookie dough is too sticky?
If your dough is too sticky, refrigerate it for 30 minutes to firm up. You can also add a bit more flour, but be careful not to add too much.
How long should I let the cookies cool after baking?
Let cookies cool on the baking sheet for about 5 minutes before transferring them to a wire rack to cool completely.
Can I freeze cookie dough for later?
Yes! You can freeze cookie dough balls on a baking sheet and then store them in an airtight container in the freezer for up to 3 months.
Why are my cookies dry and crumbly?
Cookies can become dry if there is too much flour or if they are over-baked. Ensure you are measuring your ingredients correctly and remove cookies from the oven as soon as the edges are set.
What’s the best way to store baked cookies?
Store baked cookies in an airtight container at room temperature for up to 5 days. For longer storage, freeze them for up to 3 months.
Can I use baking powder instead of baking soda?
Baking powder and baking soda are not directly interchangeable. Baking soda helps with spreading, while baking powder provides lift. If using baking powder, you may need to adjust other ingredients.
ADVERTISEMENT
We Also Recommend:
- JILIVIP App
- JILIVIP Bonus
- JILIVIP Login
- GXGWin Casino
- GXGWin Bonus
- GXGWin Register
- PHWin Login
- PHWin Bonus
- PHGinto
- JK4 Casino Online
- GXGWin App
- 9KSLOT Casino
- WinPH Casino
- 88Casino Royale
- PHGinto Login
- GXGWin Login
- 9KSLOT Login
- PHRoyal777 Casino
- YAMAN777 Gaming Casino
- GXGWin Register
KEYWORDS: Bake Cookies
Ghen is an accomplished SEO specialist renowned for her expertise in the online gaming industry. With over a years of experience, she has significantly boosted the online presence of numerous gaming platforms. Her innovative strategies in keyword research, content optimization, and link building have consistently driven substantial increases in organic traffic and user engagement. Ghen’s deep understanding of search engine algorithms and her ability to adapt to the ever-evolving digital landscape have made her a pivotal figure in the industry, helping gaming companies achieve and sustain top rankings in search results.